RAG Search
Set up RAG so the chatbot can search your WooCommerce catalogue and answer with current product names, prices and stock status.
What is RAG?
Retrieval Augmented Generation (RAG) searches your store data before the chatbot writes an answer. That gives it your real product details, prices, availability and descriptions instead of the model’s general knowledge.
Benefits of RAG
Setting Up Supabase
WooAI Chatbot Pro uses Supabase as the vector database for RAG. Supabase gives you the PostgreSQL database and the pgvector extension that makes semantic search possible.
You will create a free Supabase project, copy three values into WooAI, build the database tables with one click, then index your catalogue. Do the steps in order. Each one needs the one before it.
Creating a Supabase Account
-
Visit Supabase
Go to supabase.com and click Start your project.
-
Sign Up
Create an account using your GitHub account, Google account, or email address.
-
Verify Email
If you signed up with email, check your inbox and click the verification link.
Creating a New Project
-
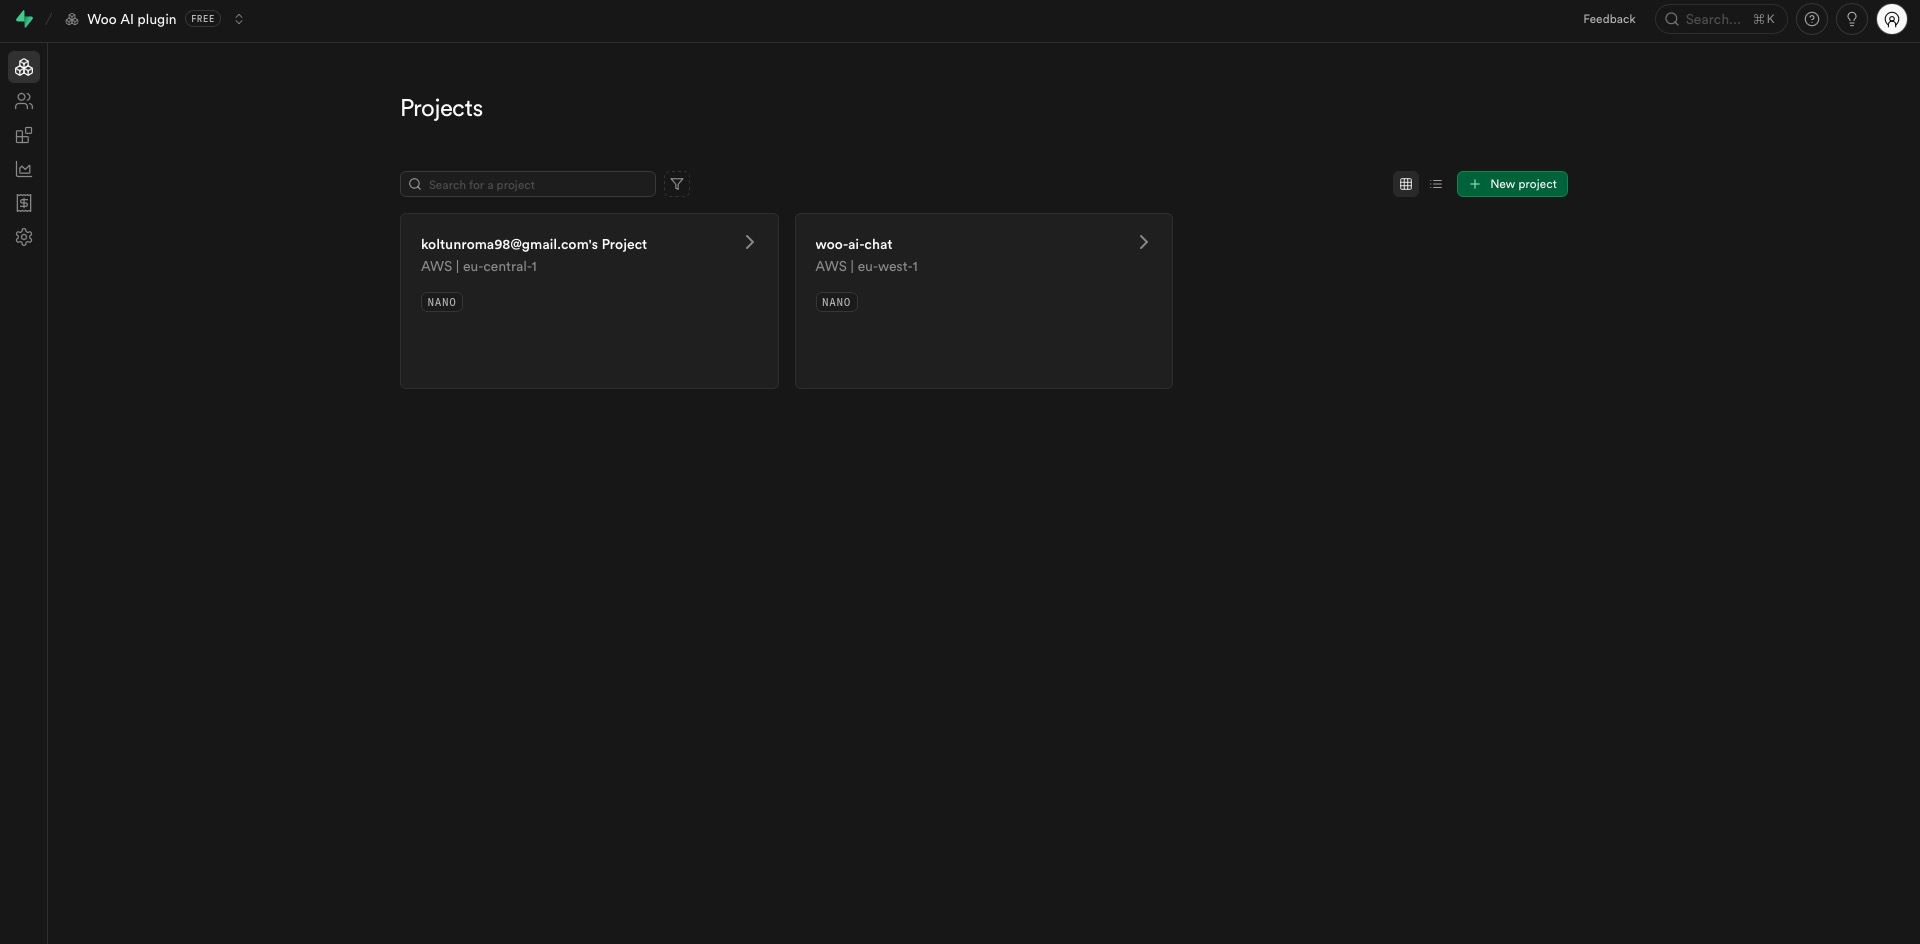
Click “New Project”
From your Supabase dashboard, click the New project button.
-
Enter Project Details
Name: anything descriptive, for example “My Store Chatbot”.
Database Password: pick a strong one and save it now. You will need it again for the connection string.
Region: whichever is closest to your WordPress hosting. -
Create Project
Click Create new project and wait for provisioning (takes 1-2 minutes).
Supabase cannot show this password again after the project is created. Store it in a password manager. You can reset it later under Settings → Database, but the original cannot be recovered.
Getting Your API Credentials
WooAI needs two values from your Supabase project: the Project URL and a secret API key.
-
Open API Keys
In your Supabase project, go to Settings → API Keys.
-
Copy the Project URL
Found under Settings → API (also shown on the project home screen). It looks like
https://xxxxxxxxxxxx.supabase.co. -
Copy a Secret Key
Open the Legacy anon, service_role API keys tab and copy the service_role key (a long value starting with
eyJ). This is the key WooAI is built for.
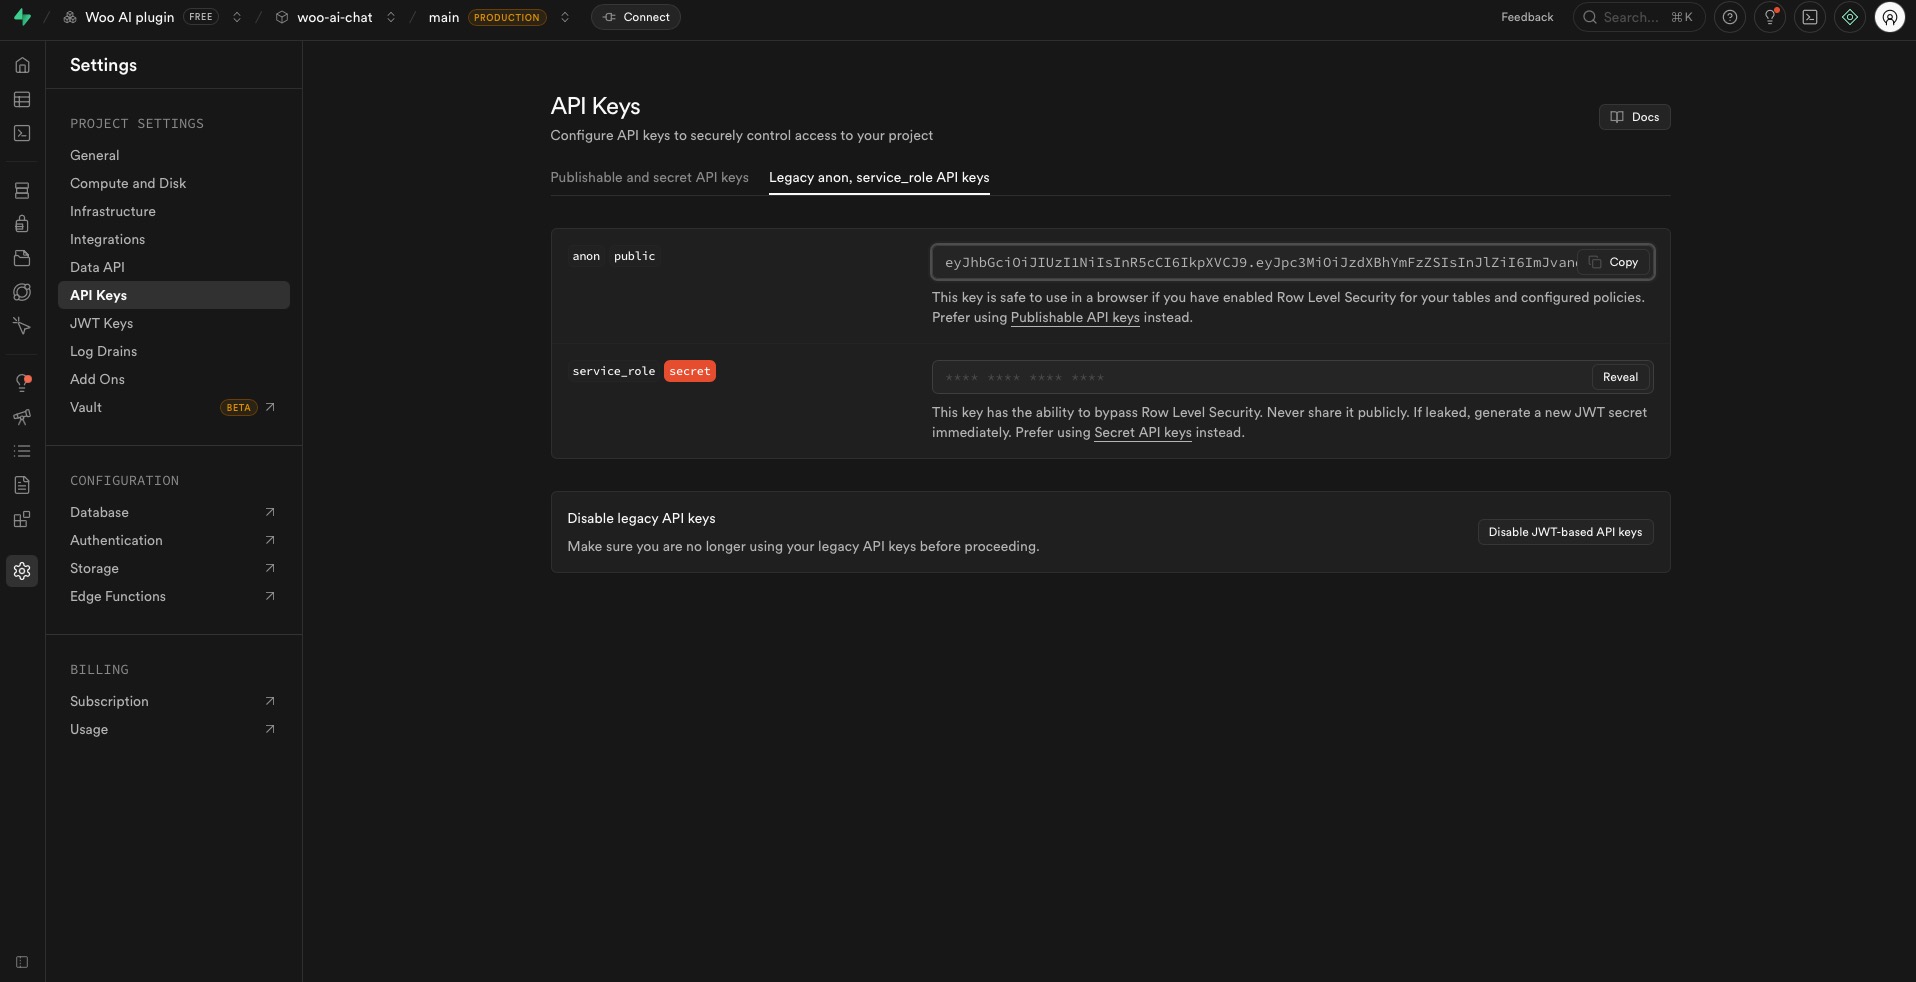
WooAI has to write product embeddings into the database. The security rules created in the schema step grant write access only to service_role. With an anon or publishable key indexing silently produces nothing. Use the legacy service_role key: the newer opaque sb_secret_… keys are not accepted by the plugin’s request format in this version.
WooAI keeps the key in your WordPress database and uses it only for server-to-server requests, so it is never exposed to visitors in the browser. Even so, never paste this key into front-end code or share it publicly.
Getting the Database Connection String
With this value WooAI can build the required tables for you. Skip it and you would run the SQL by hand instead, which is covered further down.
-
Open Database Settings
In Supabase, go to Settings → Database → Connection string. The Connect button at the top of the dashboard leads to the same place.
-
Choose the URI Format
Select the URI tab and use the pooled connection (port
6543). -
Insert Your Password
The string contains a
[YOUR-PASSWORD]placeholder. Replace it with the database password you saved when creating the project, percent-encoded: characters such as@ # / : %must be escaped (@becomes%40,#becomes%23). An unescaped password breaks the connection string.
postgresql://postgres.abcdefghijkl:YOUR-PASSWORD@aws-0-eu-central-1.pooler.supabase.com:6543/postgresConfiguring RAG in WooAI
Now enter those values in WordPress.
-
Navigate to RAG Settings
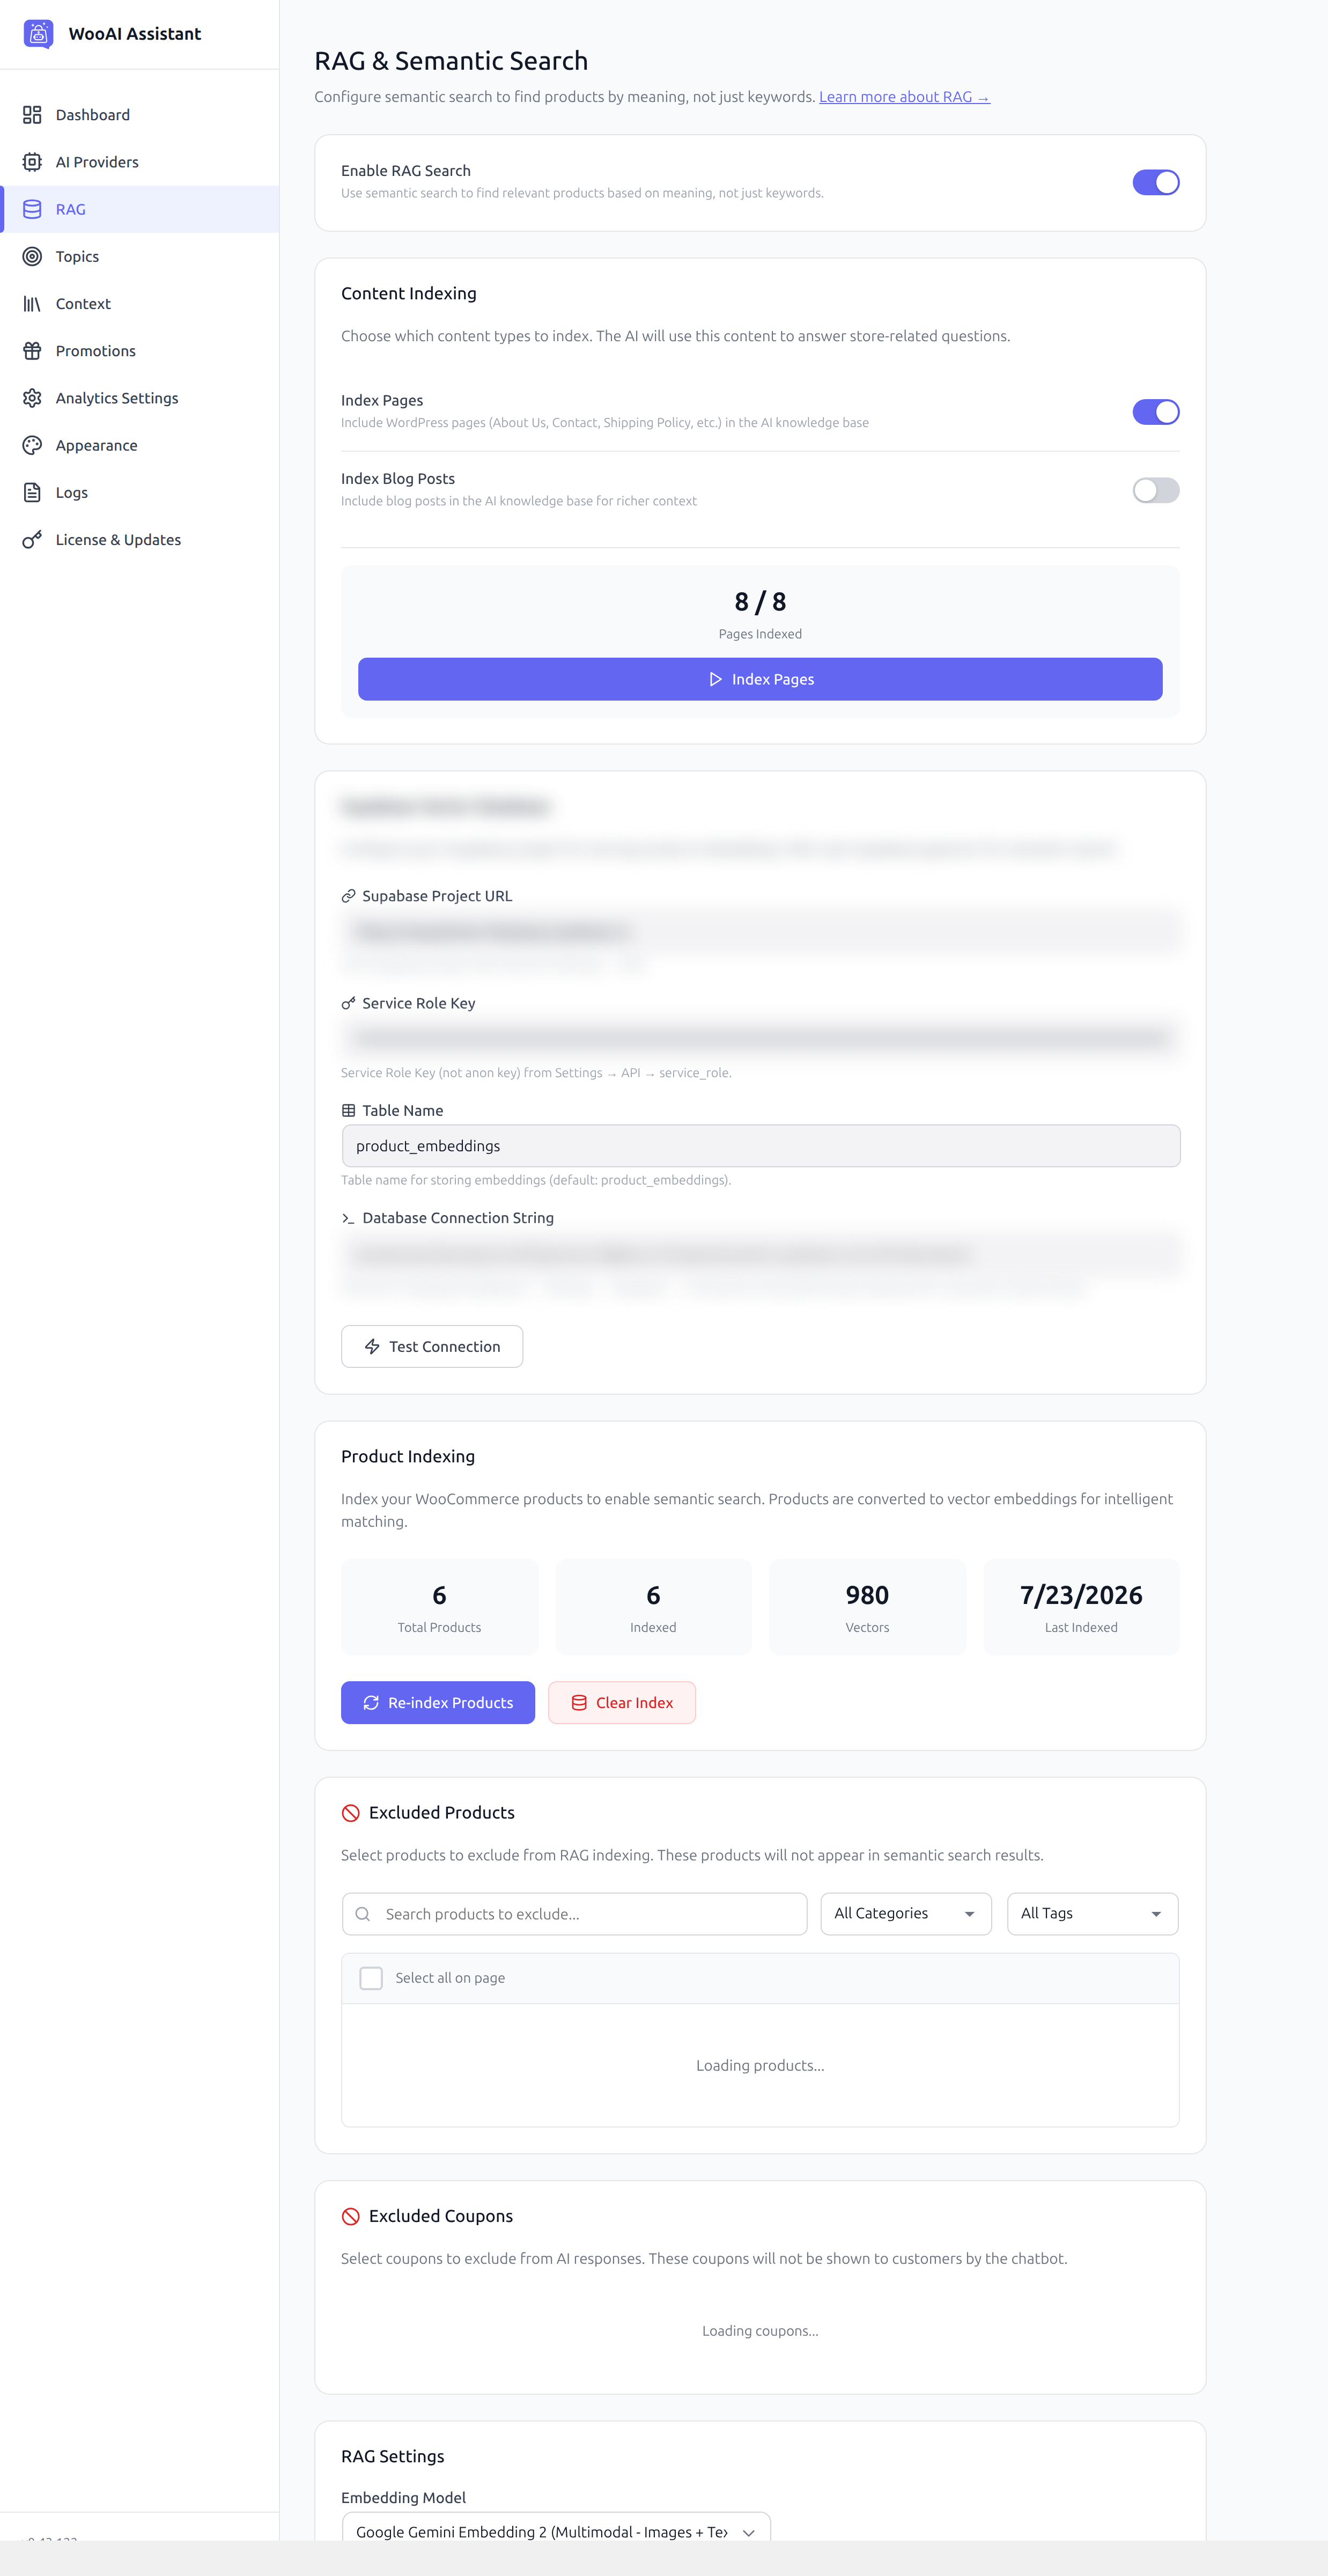
In WordPress admin, go to AI Chatbot → RAG & Search.
-
Enable RAG
Turn Enable RAG Search ON. The fields below stay disabled until you do.
-
Supabase Project URL
Paste the Project URL you copied.
-
Service Role Key
Paste the secret key. The field is labelled Service Role Key (not anon key).
-
Table Name
Leave this as
product_embeddings. The current version always uses that table name, so a different value will not take effect. -
Database Connection String
Paste the connection string with the password filled in.
-
Save Settings
Click Save Settings to store the configuration.
Creating the Database Schema
A new Supabase project is empty. Until the schema exists there is nowhere to store your products, so indexing fails. This is the most common reason a fresh install does not work.
As soon as RAG is enabled and the Database Connection String field contains a value, an Auto-Setup Database panel shows up on the RAG & Search screen. You do not have to save first.
-
Check the Status
Click Check Status. Schema Status will show one of: Needs setup, Schema is ready, or Manual setup required.
-
Run the Setup
If it says Needs setup, click Auto-Setup Database. It takes a few seconds and reports either success or the exact error.
-
Confirm
The status should now read Schema is ready.
If Automatic Setup Is Not Available
Some hosts block direct PostgreSQL connections. In that case the status shows Manual setup required and the Auto-Setup button is hidden. Create the schema manually instead:
-
Copy the SQL
Click Copy SQL to reveal the script, then click the Copy SQL button inside the revealed block to put it on the clipboard. This is the exact script for your version of the plugin.
-
Open the Supabase SQL Editor
In Supabase, open SQL Editor and start a new query.
-
Paste and Run
Paste the script and click Run. You should see “Success. No rows returned”.
-
Re-check
Return to WordPress, reload the RAG & Search page, then click Check Status again.
The pgvector extension, the product_embeddings table, its indexes, the search functions the chatbot calls, and row-level security rules that grant write access to your secret key only. The script is safe to re-run: it never deletes your embedding rows. It does drop and recreate constraints, policies, functions and the update trigger, so it always ends in a known-good state.
Testing the Connection
Click Test Connection. A green result means the project is reachable. It does not prove the key can write, because the test only reads. So before you index, double-check that the value you pasted is the service_role key. If the test fails, look for typos in the Project URL.
Indexing Your Content
Indexing converts your content into vectors the chatbot can search. Until this finishes, the bot cannot answer product questions.
Content Indexing
The Content Indexing card controls which non-product content goes into the knowledge base:
- Index Pages: WordPress pages such as About Us, Contact and Shipping Policy. Leave this on so the bot can answer shipping, returns and warranty questions.
- Index Blog Posts: pull in blog content for extra context. Optional.
Click Index Pages to process them; the card shows a counter such as 8 / 8 Pages Indexed.
Product Indexing
-
Start Indexing
In the Product Indexing card, click Start Indexing. Once something has been indexed the same button is labelled Re-index Products.
-
Wait for Processing
WordPress scheduled tasks process the products in batches, so you can leave the page and come back; reload to see the current count. If WP-Cron is disabled on your host, indexing can stall.
-
Verify
The card shows Total Products, Indexed, Vectors and Last Indexed. Total and Indexed should match.
Clear Index wipes the stored vectors for this site. You only need it when you want to rebuild the index from scratch.
Indexed data is tagged with your site’s domain so several stores can share one Supabase project. Whenever the domain changes, including a move from staging to live, run Re-index Products again, or the chatbot will find nothing.
What Gets Indexed
- Product name, description and short description
- SKU, categories, tags and attributes such as colour or size
- Price and stock status, stored as metadata
- Pages and blog posts, when their toggles are enabled. Coupons are synced separately by a scheduled job and have no toggle of their own
Excluding Content
Two cards let you keep specific items away from the AI:
- Excluded Products: products that must never show up in search results.
- Excluded Coupons: coupons the chatbot must never offer.
Automatic Sync
After the first full index WooAI keeps itself current: new products are indexed when published, edited products are re-indexed when saved, and deleted products are removed from the index. A full re-index is only needed after a domain change, a bulk import, or a change of embedding model.
RAG Settings
Keep the defaults unless search is missing products that exist, or pulling in unrelated ones.
| Setting | Default | What it does |
|---|---|---|
| Embedding Model | Google Gemini Embedding | Model used to convert text into vectors |
| Chunk Size | 500 | How much text is embedded per chunk |
| Chunk Overlap | 100 | Overlap between chunks, preserves context |
| Top K Results | 5 | How many items are retrieved per query |
| Similarity Threshold | 0.7 | Minimum relevance score, from 0 to 1 |
Similarity Threshold Explained
The threshold decides how closely an item must match the query to be returned:
- 0.9 – 1.0: very strict, only near-exact matches
- 0.7 – 0.9: balanced, and what we recommend
- 0.5 – 0.7: lenient, pulls in loosely related products
- Below 0.5: not recommended, returns junk
If customers cannot find products that clearly exist, lower the threshold to around 0.6. If results include too many loosely related products, raise it to 0.8.
Embedding Model
| Model | Provider | Notes |
|---|---|---|
| gemini-embedding-001 | Text only, good quality, low cost | |
| Gemini Embedding 2 (Multimodal) | Also understands product images | |
| text-embedding-3-small | OpenAI | Requires an OpenAI API key |
The default embedding model is Google Gemini Embedding, which uses your Gemini API key. If you set up OpenAI only (no Gemini key), do not leave this default. Switch the embedding model to text-embedding-3-small. Otherwise WooAI quietly falls back to a weak built-in method: indexing looks like it worked, but search comes back poor with no error to tell you why. Match the embedding row to whichever provider key you entered on the AI Providers screen.
Vectors produced by one model cannot be compared with vectors from another. If you switch the embedding model, run a full re-index or search quality will collapse.
Verifying That RAG Works
Open your storefront in a normal browser tab, open the chat widget, and ask about a product you know exists. Try the name first, then a description, for example “something for a small kitchen”.
A working setup answers with the real product name, the real price and the correct stock status. If the bot only answers in general terms, indexing has not completed or the schema is missing.
Troubleshooting
Indexing runs but nothing is stored
Almost always the wrong key. A publishable or anon key can read but cannot write. Replace it with the secret (service_role) key and index again.
“Needs setup” never becomes “Schema is ready”
The connection string is wrong or the host blocks direct PostgreSQL connections. Check that you replaced [YOUR-PASSWORD] with the real password, then use the Copy SQL route and run the script in the Supabase SQL Editor instead.
The bot finds nothing after a site move
Indexed data is tagged with the domain. Run Re-index Products on the new domain.
Test Connection fails
Check the Project URL for typos, confirm the project is not paused in Supabase (free projects pause after long inactivity), and confirm you used the secret key.
Search quality dropped suddenly
If the embedding model was changed, the old vectors are no longer comparable. Run a full re-index.